Webhooks by FlowMattic
A webhook is a way for an application or service to automatically send real-time data to another application or service when a certain event occurs. It is a mechanism for web applications to communicate with each other in real-time.
When a webhook is set up, it typically involves the sending application making an HTTP request to the receiving application, along with some relevant data to the event that just occurred. The receiving application can then take that data and use it in whatever way is necessary to respond to the event.
Webhooks by FlowMattic is a feature the FlowMattic plugin provides that allows users to receive real-time notifications and updates from their applications or services. A webhook is a way for an application or service to send automated notifications to other applications or services when a specific event occurs. With webhooks, you can automate workflows and streamline your business processes, making managing and growing your business easier
Here is a step-by-step guide to help you set up your webhook with FlowMattic:
Step 1: Create a workflow
Click on the “New Workflow” button in FlowMattic dashboard to create a new workflow. Then select “Webhooks by FlowMattic” as trigger. You can use webhook trigger to capture data from any external application as well. Make sure that the application has webhook support.

Step 2: Get the Webhook URL
Webhook URL will be automatically generated by the application, so there is no need to manually create one. Once the webhook URL is generated, you simply need to copy it and use it in your application or service. It is important to note that the webhook URL should always be publicly accessible, otherwise, no application will be able to send data to the webhook URL.

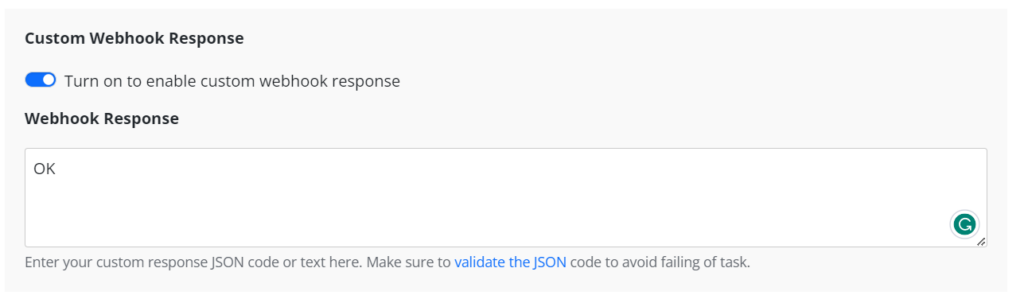
Step 3: Define Custom Webhook Responses
Customize your webhook response by choosing the response you want to receive whenever you or the application access your Webhook URL. FlowMattic provides a response in form of JSON data, which is the default response. However, you can also create a custom response by entering your custom text or providing valid JSON code.

For example, if you want to receive the response user should enter the string in the custom response input as per their requirement, in this case, enter “OK” as the response text. Ensure that your JSON code is correct and properly formatted to avoid errors.
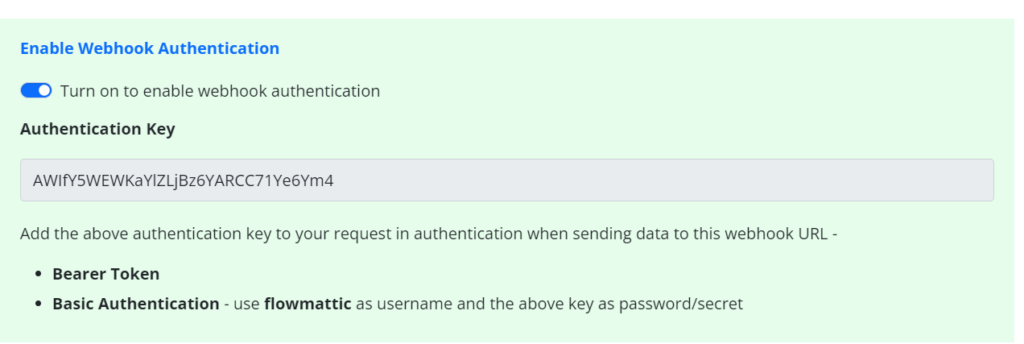
Step 4: Enable Webhook Authentication
Decide whether you need authentication for your webhook. If authentication is required, FlowMattic will share a secret key with you, which you can use to authenticate your requests. If you enable this option, you will receive an authentication key that you need to provide along with the bearer token or API key. If you have enabled authentication, you must share the secret key with the application you want to integrate with FlowMattic. This is to ensure that the application can access your webhook URL securely.
Step 5: Define a Simple Response
FlowMattic captures all the data it receives irrespective of the toggle being enabled or disabled. However, the toggle serves a different purpose. When the toggle is disabled, FlowMattic still captures all the data but only displays the parent level keys. The nested objects are set as JSON to the value of the respective parent key.

On the other hand, when the toggle is enabled, FlowMattic displays all the data including the nested objects, providing greater control over which data points are visible and which ones are not. This feature helps in streamlining the data collection process, making it more efficient.

Step 6: Save the Workflow
Once you have defined your webhook settings, click “Save” to save the workflow. Your webhook is now set up and ready to be triggered by the specified URL.

Conclusion
Setting up a webhook with FlowMattic requires you to choose your application, set up your webhook URL, customize your webhook response, validate your JSON code, decide on authentication, share the secret key, and receive a simple response. Following these steps will help you set up your webhook successfully and receive real-time data updates. If you need any assistance or have any questions, don’t hesitate to get in touch with FlowMattic’s customer support.
